React.js에서는 앱 전체의 CSS가 하나의 네임스페이스를 공유한다.
즉, 서로 다른 컴포넌트에서 import 되었고, **서로 다른 CSS파일**임에도
중복된 클래스네임을 사용할 경우 충돌이 발생한다.
예시를 들어보겠다.
📂/src/Blue.css
.box {
  font-family: sans-serif;
  text-align: center;
  background-color: aqua;
  height: 200px;
}
📂/src/Blue.jsx
import "./Blue.css";

export default function Blue() {
  return (
    <div className="box">
      <h1>I am Blue</h1>
      <h2>bb</h2>
    </div>
  );
}
📂/src/Green.css
.box {
  font-family: sans-serif;
  text-align: center;
  background-color: green;
  height: 200px;
}
📂/src/Green.jsx
import "./Green.css";

export default function Green() {
  return (
    <div className="box">
      <h1>I am Green</h1>
      <h2>bb</h2>
    </div>
  );
}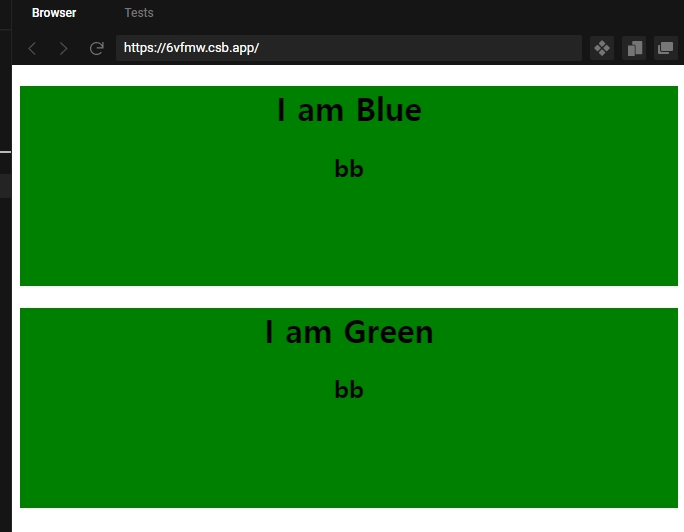
<Blue/> 컴포넌트에는 Blue.css 파일이, **** 컴포넌트에는 Green.css파일이 적용되었다.
하지만 같은 클래스네임(.box)을 사용하다 보니, 각각의 컴포넌트에 다른 스타일링이 적용되지 못하였다.
즉, Blue.css의 .box와 Green.css의 .box를 구분하지 못했다는 이야기다.
예시) https://codesandbox.io/s/2021-04-01ihatecss-chnln
이러한 문제를 해결하기 위해 우리는 CSS Module 기능을 활용할 수 있다.
CSS Module은 CSS파일로부터 클래스를 불러와서 사용할때
[파일이름]_[클래스이름]_[해쉬값] 형태로 클래스이름을 자동으로 **''유니크한 값''**으로 만들어준다.
CSS Module을 사용하기 위해서는
먼저 기존 css파일의 확장자를 .module.css 로 변경해야 한다.
📂/src/Blue.module.css
.box {
  font-family: sans-serif;
  text-align: center;
  background-color: aqua;
  height: 200px;
}
📂/src/Blue.jsx
import style from "./Blue.module.css";
//💕 그리고 CSS Module파일을 "style"이라는 이름으로 import하면, style이라는 객체가 만들어진다.
//💕 각각의 클래스는 {style.클래스명} 혹은 {style['클래스명']} 으로 접근할 수 있다.
export default function Blue() {
  return (
    <div className={style.box}>
      <h1>I am Blue</h1>
      <h2>{style.box}</h2>
      {*/ Blue.module.css 파일의 .box 클래스를 사용하고 싶다면/*}
      {*/ style.box로 불러올 수 있다. /*}

    </div>
  );
}
📂/src/Green.module.css
.box {
  font-family: sans-serif;
  text-align: center;
  background-color: green;
  height: 200px;
}
📂/src/Green.jsx
import styles from "./Green.module.css";

export default function Green() {
  return (
    <div className={styles.box}>
      <h1>I am Green</h1>
      <h2>{styles.box}</h2>
    </div>
  );
}
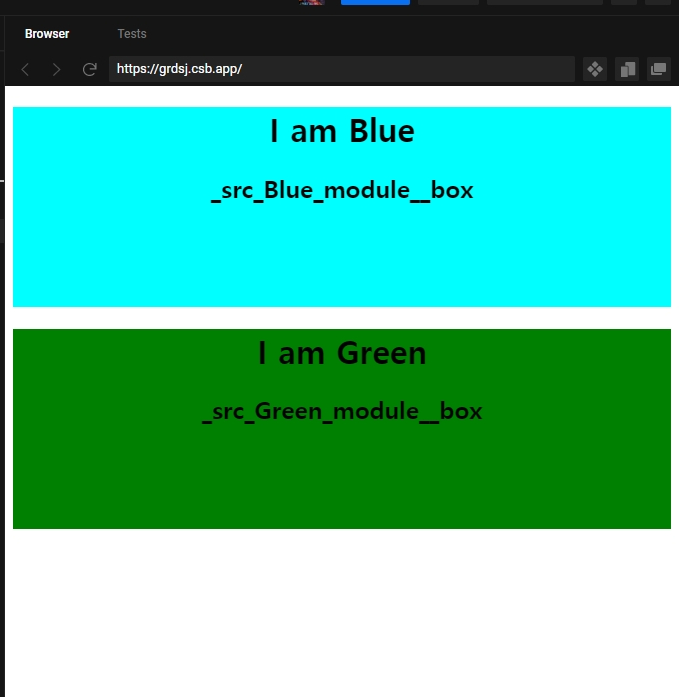
예시) https://codesandbox.io/s/2021-04-01ihatecssmodule-forked-exquw
$ npm install classnames
ClassNames는 CSS 클래스를 **조건부**로 설정 할 때 매우 유용한 라이브러리이다.
아래와 같이 특정 Class를 {클래스 이름 : boolean} 으로 설정하면,
true, false 여부에 따라 해당 클래스를 반영시킬 수 있다.
예시
import classNames from 'classnames';

classNames('one', 'two'); // 'one two'
classNames('one', { two: true }); // 'one two'
classNames('one', { two: false }); // 'one'
classNames('one', ['two', 'three']); // 'one two three'

const myClass = 'hello';
classNames('one', myClass, { myCondition: true }); //'one hello myCondition'

const MyComponent = ({ highlighted, theme }) => {
  <div className={classNames('MyComponent', { highlighted }, theme)}>Hello</div>
} //highlighted 인자에 전달되는 값이 true이면
//div의 클래스 네임으로 {classNames('MyComponent', { highlighted : true }, theme)}이 전달될 것이다.
//그리고 them 인자에 전달되는 문자열이 div의 클래스로 추가될 것이다.
추가적으로, CSS Module과 classNames를 함께 활용할 수도 있다.
특히 classNames.bind() 메서드를 이용하면, 여러 클래스를 동시에 적용시킬 때 보다 편하게 작성할 수 있다.
import React from 'react';
import classNames from 'classnames/bind';
import styles from './CSSModule.module.css';

const cx = classNames.bind(styles); // 미리 styles 에서 클래스를 받아오도록 설정하고

const CSSModule = () => {
  return (
    <div className={cx('wrapper', 'inverted')}>
          {*/이렇게 하면 기존 CSS Module 기능만 활용하는 것보다 간결한 코드 작성이 가능해진다./*}
          {*/ 기존 방식 : {styles.wrapper} {styles.inverted}/*}

      안녕하세요, 저는 <span className="something">CSS Module!</span>
    </div>
  );
};

export default CSSModule;
예시 ) https://codesandbox.io/s/2021-04-01ihatecssmodule-grdsj